Chain Link Fence Installation
Chain link fences are economical and effective for containing pets, kids, and property. Chain Link Fence NJ can also provide security against intruders. Dig holes for corner, gate, and end posts three times wider than the post diameter. Pour concrete into the holes and level to prepare for frame installation.
 Post-installation is the first step of the process and the most important. Posts create the frame to which steel mesh fabric is attached. The structure supports the fence and keeps it from sagging over time. To install posts correctly, you must have many tools and supplies, including a two-person auger and a pole hole digger. You also need to know how to use them properly. This is why most people hire a professional to complete their Chain Link Fence Installation.
Before digging holes it is important to call 811. This will allow your local utility marking service to show up and mark any water, gas or power lines that might be in the area before you dig. Taking the time to do this will save you time, money and possibly a lot of headaches in the long run.
Start by digging your corner, gate and end posts using a post hole digger or two-person auger. The holes should be about three times larger than the post diameter. When digging the holes, be sure to avoid any rocks or tree roots. You can ‘bell’ the holes at the bottom to compensate for holes that might be too shallow due to an obstruction.
Once the posts have been dug, set them in concrete and brace them with stakes if needed until they are plumb. If you are unsure how to do this, ask for help from a friend who has experience with building projects. It’s a good idea to have someone hold the posts plumb while you pour and tamp the concrete in place.
When the posts are set, let them cure for a few days before starting to work on other parts of the fence. During this time, you will need to stretch a masonry guide string tight between each of your terminal posts. This will serve as your reference point as you continue to set posts. The string should be pulled taut to prevent sagging and movement that might affect how the fence is set.
Once the line posts have been set, it’s time to install the chain link fabric. Chain link fencing fabric comes in a variety of colors, styles and heights to meet your needs. It is secured with metal fence ties and may include features such as a gate or other type of barrier. Some communities require permits for fences above a certain height, so check with your local building department to determine the specific requirements in your area.
To install the fence fabric, start by unrolling the material. Next, slide a tension bar vertically through the beginning ends of the chain link fence fabric. Hook the stretch tool onto this bar on the inside of the fence. Pull the chain link fence fabric to the other end of the yard, or if you’re doing a long stretch, stand it and lean it up against the posts. You can also hand-stretch the chain link fence, but it’s usually easier to use a stretching tool for long stretches.
After the fence has been stretched, tie it to the rail and poles with fence ties. You’ll need to make a tie every foot along the length of the fence. Once the fence is tied, you can now add gate hardware and other finishing touches.
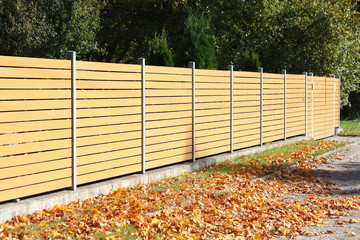
You can also choose to add slats or greenery to your chain link fence, adding another layer of privacy and enhancing the appearance of your property. These additions are available in a wide range of colors, and while they don’t provide 100% privacy, they significantly reduce visibility.
You’ll also need to install corner, gate and end posts. You’ll want to use a level to ensure that the corner, gate and end posts are plumb and square. Then, dig holes for the posts and set them in place. After each post is set, fill the hole with gravel and tamp it down to create a solid base for your new fence. Then, pour concrete and let it set for two to three days. When the concrete is set, add a few shovelfuls of gravel to the bottom of each hole and tamp it down.
Chain link fences offer no privacy on their own, but you can add privacy to your property with slats that fit between the links. These slats come in a variety of colors and designs, so you’ll be able to find the perfect look for your home and yard. You’ll also need to install privacy slats at the ends of your fence where it meets your driveway, gate or porch.
Before beginning your project, make sure to obtain any necessary zoning and building permits. Also, check with your local utility company to locate any buried utilities in your area that may interfere with the construction of your fence. You should also check with your homeowners association (HOA) to ensure that your plan will comply with their rules regarding types of fencing materials.
Determine where the corner, gate and end posts will be set and mark them with spray paint or stakes. Then, measure the total length of your planed fence to find out how much chain link fabric and top rail you will require. It is recommended that all posts be set approximately 4″ inside of your property lines to prevent concrete footings from encroaching onto adjoining properties.
Dig holes for the terminal, gate and end posts in your planned location. If the ground is sandy or hard, you can use a post hole digger to help you get a deep enough hole for your concrete footer. For clay or rocky ground, dig the hole by hand with a spade.
Once the terminal, gate and end posts are set and the concrete footings have cured, slip the tension bands and brace bands on to each of these posts. You should ‘pre-squeeze’ the bands with a pair of fence pliers as you slide them on to help keep their bolt holes aligned. This will make connecting the roll of fence fabric later on much easier.
Next, string a guide line along the length of your planned fence. If your soil is not flat, you can level it using a shovel and hoe to prepare the site for the installation of your fence. Set your terminal and line posts plumb to the guide line, being careful not to hit the string. Then, set the remaining line posts at intervals approx. 1/8″-1/4″ off the string to account for differences in pole diameters and your soil conditions.
Before beginning the fence installation process make sure all permits and zoning laws are satisfied. Also check local building codes for specifications such as frontage locations and allowable fence heights. Finally, stake or survey your property lines. Also call your local utility company to locate any underground pipes or cables. It is important that all posts are set properly in concrete so as not to shift or sag during the chain link fence installation process. To ensure this, start with the end, corner and gate posts. Dig holes for these posts at least 8 inches in diameter and 30 inches deep. Use a level to check for plumb and slope the hole so water drains away from the post. Set the posts in the holes and pour a good amount of concrete around each post. Let the concrete cure for two to three days.
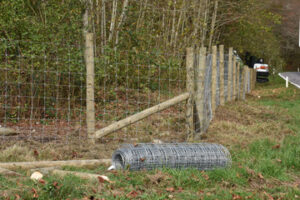
Roll out the fence fabric and weave together. Make sure there is enough length from the roll to span the gap between terminal posts. Weave tension bars into both ends of the fence fabric. Use ties to secure the chain link to the tension bar. When a section of the fence reaches a terminal post, stretch it taut with a fencing puller until the diamonds’snap’ back to the post and the ends of the fence fabric meet with less than a quarter inch between them.
If you have a large gap between two line posts, install a bottom tension wire (also called coil wire) between each terminal post to help minimize in and out movement of the fence fabric. This can be a cost saving alternative to a top rail for chain link fence installations.
For fences taller than 10 feet, a top horizontal rail is usually added to add vertical rigidity. This can be a cost saving alternative as well to a bottom tension wire.
When installing the top rail, be sure to use a brace band to support and truss the terminal posts. A brace band has a long flat side that is placed against the terminal post and a short round side that is attached to the top rail.